Newbie knows that you want to just start cruising the internet like a pro. How else are you going to spend all day talking to hot chicks in super awesome chat rooms? Well mister, if you want to be a real pro at the new and awesome world of the internet, then you better learn you good when it comes to Microsofts dominating web browser Internet Explorer.
Remember back when Microsoft was being taken to court for all of those nasty anti-trust lawsuits? Well one of the main defendants in the case against the mega-super behemoth was none other then Netscape (whos web browser you can read about here). Well the old suits at Netscape were all pissed that Microsoft was packaging every Windows system that was sold with their Internet Explorer software, hence making Netscape all but obsolete like that librarian from the Twilight Zone.
Well what does all of this have to do with you getting on the internet you might ask. Well mister, it has absolutely nothing to do with it, but it sure was a good history lesson wasnt it?
In all reality if you only knew how to use Internet Explorer you would be pretty much good to go. Every computer, even most Macs, have it installed and most pages are optimized for it. Internet Explorer is by far the most widely used web browser on the planet, and if you want to stay current and cool with technology, then you better do yourself a favor and learn Internet Explorer. Soon you will be cruising like a real pro, and dont forget that it was Newbie that gave you the must needed instructions.
These beginning sections will help you learn and understand the basic operations
and functions of Internet Explorer.
Opening a the Internet
Explorer Browser
1. Click the Start ![]() button.
button.
2. Go to Programs, highlight and click Internet Explorer.
3. Alternatively
click the Internet Explorer icon  on
the Desktop or on the Taskbar
on
the Desktop or on the Taskbar ![]() next
to Start button.
next
to Start button.
Beginning
Basic Browsing
The important thing to remember when you first begin browsing the web is the Web address of a site you wish to visit. Go up to the "Address Bar" near the top of the page, and click on it. Now you can type in the Web address of the site you want, and then press enter. Internet Explorer will go to this site directly from whatever document you were currently viewing. This is much faster than going to a search engine and trying to locate the site you want in their directories, or searching for it with a query. (Address Bar shown below)
![]()
Your first time that you browse the web, you may have some difficulty. Efficiently browsing the Web is just like any other complex task in life, it takes practice to be good at it. Internet Explorer has some built-in features which will help to make it easier for you to browse the web. The fastest way to get to a place that you dont know its address and you want to search for, is to click on the "Search" button on the Internet Explorer main toolbar. This button will take you to a document within Microsoft's home site. On this document you will find a choice of categories to look through and a list Search Engines to use. A Search Engine is an application that will attempt to find any documents that contain the subject or phrase that you enter into the search parameters. You can also browse through the categories of Web sites that the search engines have already organized for you.
Alternatively you can go to specific search engines that you know their address.
The Main Explorer Toolbar
![]()
The main toolbar is composed of eleven different buttons. Each of these buttons
has a different function and purpose in Internet Explorer. The individual buttons
will each be discussed in the following sections.
The Back Button : This button will take you back to whatever document you were previously viewing. Pressing it immediately takes you back one document. If you have browsed many pages, or are well into a multi-page document, pressing it repeatedly will continue to back you up one page at a time. Once you reach your starting location, it will be greyed-out and unavailable.
The Forward Button : This button will take you forward to the next document if you have previously browsed multiple documents and had then backed-up to the page you are currently viewing. (If you have not backed up at all, the forward button will be greyed-out) Pressing it repeatedly will continue to move you forward one page at a time. You can move forward until you reach the last page that you had browsed, at which time the forward button will be greyed-out.
The Stop Button : The stop button stops ANY current operations by Internet Explorer. It will stop any type of file from loading. It can also be used to stop animations from continuing once a page is loaded. If you press it before a page has finished loading, the page will display everything it had finished loading before the stop button was pressed. If a document is completely loaded and there are no animations, movies, or other files still running, the stop button will have no immediate function.
The Refresh Button : This button will reload the current document that you are viewing. It is useful if the page updates very frequently so that you can view these changes as soon as they are available. If you are loading a document and the transfer was interrupted, you can reload the full document again by clicking here.
The Home Button : This button will return you to the page you have selected as the default start-up page for Internet Explorer. It will not take you back to the beginning of your web browsing, it will just return you to your home location from where you are. If you press back after reaching your home page, you will go back to the page you left after you hit the Home button.
The Search Button : This button will take you to the page you have selected as the default Web search page for Internet Explorer. If you have not selected a page it will take you to Microsoft's default search page.
The Favorites Button : This button will open up the Favorites menu. You can choose a favorite that you wish to go to from the list, add a favorite to the list, or organize your favorites from this menu.
The Print Button : The print button will bring up a Print dialog box. In the box you can decide if you would like to print the contents of the page you are viewing, how many pages you will print, and also how many copies you will print. Keep in mind that if you try to print a page that is graphics intensive, you will need a printer that is capable of printing graphics. Also, the more graphics and pages a Web site has, the longer it will take to print.
The Font Button : Pressing this button causes Internet Explorer to cycle through the available font sizes. This button is useful if the text is too small to read, or too large to fit comfortably in the window.
The Mail Button : This button will open into a drop down menu from which you can select to read or send E-Mail. You can also open up your newsgroups from this menu.
The Edit Button : This button will ONLY be on your toolbar if you have a Windows system Web editor (such as Microsoft Frontpage or Microsoft Word) installed on your computer. If you press this button, it will launch that editor and open the document you are currently viewing in it.
Viewing Documents While Not
On The Web
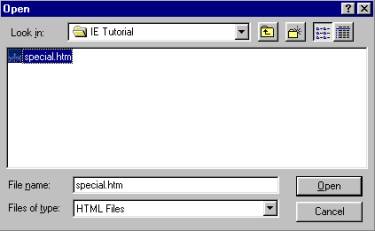
Internet Explorer is capable of displaying HTML documents and images even if
you are not connected to the Internet. Go to the file menu from the main menu
bar. From this menu select "Open", the open dialog box will appear.
(You can also press CTRL-O from the main Explorer window to access this box)
In this dialog box, you can type in a Web address to access a page on the Web.
Since we are not on the Web, click the "Browse" button to look at
files on the hard drive. Select the type of file you want to open from the drop-down
menu at the bottom of the box. After you have selected the file type, go to
the directory that contains this file. Select the file and then click "Open".
The document, image, movie, or sound file you have selected should now be viewable
in Internet Explorer.
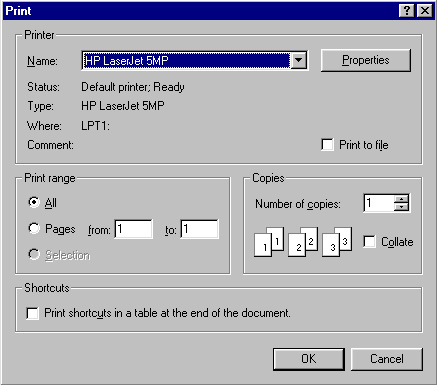
Printing Web Documents
If your computer is connected to a printer, you can print out any Web document that you wish whether you are viewing it on the Web, or if you are just viewing it from your hard disk. Go to the file menu from the main menu bar. From this menu select "Print", the Print dialog box will appear. (An easier way to open this box is to simply click the "Print" button on the main toolbar or to press CTRL-P) In this dialog box you can decide how you would like to print the contents of the page you are viewing, how many pages you will print, and how many copies you will print. Keep in mind that if you try to print a page that is graphics intensive, you will need a printer that is capable of printing graphics. Also, the more graphics and pages a Web document has, the longer it will take to print.
Setting
Your Default Start-Up Page
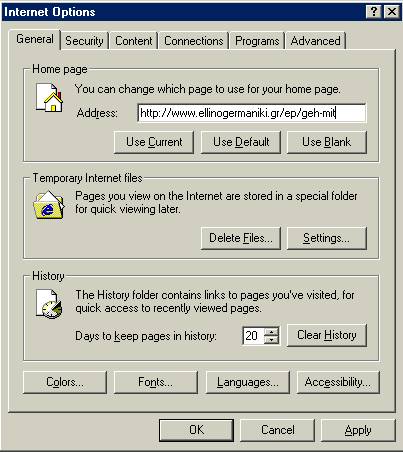
The "Start-Up" page is the Web Site or document that Internet Explorer
will open automatically every time that you start the program. These steps will
show you how you can change this page to whatever location you prefer.
From the Tools dialog box, click on the "Internet Options" folder tab at the bottom of the box. You can change the start-up page from here. (The customize section is outlined in red for your convenience).
Click on "General" and then click in the Address box.
Type the address of the page you would like Internet Explorer to open each time you start the program. If you are satisfied with your choice and are done setting options, click on "Apply" then "OK" at the bottom of the Internet Options box.