by Jeremy Wray
The purpose of this tutorial is to provide an introduction to the JavaScript programming language. It assumes no knowledge of programming, however it requires a good knowledge of HTML since the primary use of JavaScript is to be imbedded within an HTML document and to be interpreted within a web browser. Other good sources for study include the brilliant Webmonkey site, and the book "JavaScript: The Definitive Guide (4th Edition)" by David Flanagan and published by O'Reilly.
The form of this tutorial is basically lots of little examples of script with explanations of their use. Most of the headings at the top of each section are also links to a page demonstrating the topic. Play with them, alter them and learn! All of the examples can be used since they download into your browser when opened. In Internet Explorer, use the View menu and choose Source to see the code, if using Navigator, save the file, then open it in Notepad or similar text editor, or you can download the whole tutorial in Zip format (see below) to save your net connection. Where JavaScript code is written within the text of the tutorial, it appears in this colour and font to distinguish it. HTML code is written in this colour and font. Bits of code which are not the focus of attention are lowlighted like this.
Just before we go on, JavaScript IS NOT the same as JAVA, the language developed by Sun Microsystems. It was called JavaScript as a marketing ploy, it was originally called LiveScript. The two languages can, however, be used together, but I don't cover this here.
If you wish to contact me, about errors, omissions, praise, criticism or just for a laugh, mail me on: jel@jelnet.co.uk
JavaScript is written within the <script language="JavaScript"></script> tags. The "language=" part is not essential, as Javascript is currently the only script used within HTML, however this may change, so it is best to use it.
It usually goes between the </title> and </head> tags like this:
<head>
<title>My Web Page</title>
<script language="JavaScript">
My Script here...
</script>
</head>
However, script may appear anywhere in the document as necessary. A rule of thumb is that if it can be located at the top, then that's preferable as it's easy to find in one place, though this isn't always possible. This will become obvious as we proceed with the tutorial.
The alert() is used to display a dialogue box with a message. The user must click "OK" before continuing:
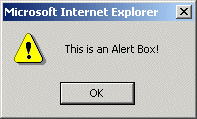
It's coded like this:
<script language="JavaScript">
//put up an alert box, to show how they work
alert("This is an Alert Box!");
</script>
These are useful to give the user messages, perhaps if they failed to fill in a required form field and also to debug your code. For example, if you get a script error, you can insert an alert to see if the error occurs before or after your alert, or to display the value of a variable (more on that later).
Notice above the use of the Javascript comment: "//". Similar to HTML comments, script preceeded by these to the end of a line will be ignored. This is useful to document your code, for yourself and others that may need to read it later. Always use plenty of comments to explain your code.
Larger sections (multiple lines) can be commented out like this:
/* this is a largerIn addition, JavaScript statements should be "commented out" with HTML comments for the benefit of browsers that don't support JavaScript (though this is now rare), otherwise those browsers will simply display the JavaScript code as text on the page - NOT good. It can be done like this:
<script language="JavaScript">
<!-- This is an HTML comment for backwards compatibility--
//put up an alert box, to show how they work
alert("This is an Alert Box!");
//
--end of HTML comment-->
</script >
Notice the "--end of HTML comment-->" preceeded by the "//", this is done since otherwise JavaScript will read the closing HTML comment as an error. The browser will not display anything anything between html comment tags (i.e. script statements), however if it's JavaScript enabled it will process those statements.
Multiple alerts can be used like this:
alert("Here is one Alert!");
alert("Then another!");
alert("And yet another!!!!!");
Statements are the sentences of Javascript, semi-colons are the end punctuation marks, spaces and line-breaks are ignored. The semi-colons are sometimes missed out, but should be used or they can mess up code later on.
Variables are a way of storing information in Javascript. There are written like this, usually in the header part of the web page:
var secs_per_min = 60;
The var part is not strictly necessary but useful as it tells us that what follows is a variable. They must start with either a letter or an underscore, after that, they can have numbers. In some browsers they are case sensitive, some not, but it's best to chose a naming convention and stick with it, for example the above variable could also be written:
var SecsPerMin = 60;
They should try to be descriptive (for later/other people's recognition) but not too long to type. You don't have to give the variable a value right away, for example you can define a variable with an empty value, which is going to be used later like this:
var MyVariableForLater = "";
This is a good practice to prevent errors, particularly when a variable may or may not be used in a later part of the program. Variables can be made of a sum of others. For example, if we create two variable like this:
var secs_per_min = 60;We could create:
var secs_per hour = secs_per_min * min_per_hour;The "*" operator here means "multiply".
Having declared the above variables in the header of our document, we can use them to write HTML to our web page. As mentioned, variables that are used or referred to later on are declared with zero value, (eg. var variable = "";) in the header of the document. This is because the variable itself may represent a value for something which hasn't yet happened, and so when reading your JavaScript, the browser will error calling it "undefined". If, however, the variable is delared, even with a zero value, the browser has a definition for it. Thus it's good practice to get into the habit of declaring variables to save headache.
Declared variables can be used to write HTML into the web page using the "document.writeln()" method. A method is basically a function (a resuable chunk of code), in this case "writeln()" attached to an object, in this case "document". You may have heard the term "Object Orientated Programming", what that basically means is a methodology of programming where the program and it's function are broken down into parts that resemble physical objects. These objects can interact with one another and have various properties, methods and events.
For instance, imagine a guitar, this is a real world object. One of it's properties might be it's colour, or it's tone when played. Strumming it's strings is a method associated with the guitar, plucking it's strings would be another method. An event associated with the guitar might be the vibration of the strings that make the sound, or one of the strings breaking. An event can be handled, for instance the vibration of strings event could be handled by a microphone to make it louder, or, if it's a bum note, by damping the strings with your hand. If you played the guitar in a band, it would be interacting with other objects, perhaps a keyboard object, and the means by which these instrument objects were able to interact is music itself.
Don't worry too much about objects and methods at the moment, there's more on that later, but basically document is the object that represents an HTML document, and writeln() a function attached to that object like a handy built-in tool. Here are examples of using document.writeln() method to write the value of a variable and a text string (a string is a set of one or more text characters):
document.writeln(secs_per_hour); this is how you write the value of a variable.
document.writeln("text"); this is how you write the value of a text string.
document.writeln(secs_per_hour + "text" + secs_per_min); this is how you combine the two.
Basically, whatever appears between the ( ) will be written to the page. Between " " 's is read as text, otherwise JavaScript assumes it's a variable, which if it does not exist, will cause an error. The two are combined simply using the + operator between them.
As we saw above, variables may hold actual text strings eg;
var greeting = ", hello, how are you?";
var question = " What are you doing?";
Using the prompt() method, we can create another variable from the user's input. The prompt method will bring up a dialogue box:
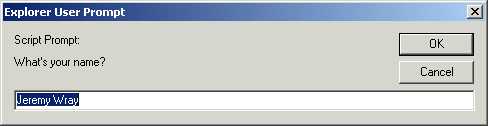
It's coded like this:
var name = prompt ("What's your name?", "Jeremy Wray");
The prompt() method has two parameters, we'll look at these in more detail later, but basically they are the two items in brackets after the word prompt(), in this case "What's your name?", and "Jeremy Wray", notice a comma is used to separate them. You'll see that they form the question and the default text, respectively, in the prompt dialogue box. We could leave either or both these parameters blank like this: prompt("", ""). The variable name, above, becomes equal to whatever the user enters in the box, or if the user doesn't change it, the default value "Jeremy Wray".
Using a string operator such as "+", variables may be combined, or "concatenated" eg:
var both = name + greeting + question;
So, if the user clicks "OK" at the prompt(), the above would translate to:
var both = "Jeremy Wray, hello, how are you? What are you doing?"
In the above example, as well as creating the both variable, I created
some new variables by applying methods to both like this:
var new_variable_name = both.method_name();
so as to make copies of the
both text string in different styles, eg. bold
or italic:
var bold_both = both.bold();
var italic_both = both.italics();
var upper_both = both.toUpperCase();
var red_font_both = bold_both.fontcolor('red');
These styles, eg. toUpperCase() are actually methods of the JavaScript String object of which there are quite few. Notice the above style changes could also be written with HTML, eg. The italic style could be written as:
var italic_both = "<i>" + both + "</i>";
The document.writeln() method is then used to write the results to the page:
document.writeln(both + "<br>");
document.writeln(italic_both + "<br>");
document.writeln(upper_both + "<br>");
document.writeln(red_font_both + "<br>");
Finally, you may have noticed that previously I said that a method was a function attached to an object, however, when I used the prompt() method, above, it was not attached to anything. Well, in fact it was, it was attached to the window object and it could have been written as: window.prompt(), it's just that window is the default object and it's presence is assumed in the absence of anything else and so doesn't have to be written. Among the many window object methods is also alert().
If / Then branching enables your program to behave differently depending on user input or some computation within the program. They are written like this:
if (some condition is true){
execute these statements;
}
The important points are:
The spacing is not important, it's there for readability. Note that after the condition, there is no ";". Here's an example:
var question = prompt("Would you like to see the if/then results?", "Type yes or no");
if (question == "yes"){
alert ("Great! Here's the results, please read on!");
}
Note the "= =" in the condition, this simply means "equals". A common mistake is to use a single "=" which would have the effect of saying that question should equal "yes".
Here are some typical conditions used in if statements and JavaScript operators (eg. the operator "!=" means "is not equal to"):
(variable_1 > variable_2) is true if variable_1 is greater than variable_2
(variable_1 < variable_2) is true if variable_1 is less than variable_2
(variable_1 <= variable_2) is true if variable_1 is less than or equal to variable_2
(variable_1 >= variable_2) is true if variable_1 is greater than or equal to variable_2
(variable_1 == variable_2) is true if variable_1 is equal to variable_2
(variable_1 != variable_2) is true if variable_1 does not equal variable_2
Note that you could replace a variable with a value, eg. a number.
Combining If / Then Conditions (top)
Conditions can be combined eg:
if (age >= 21 && age < 30)
The above specifies that the statement in curly brackets will run if the age is greater or equal to (>=) 21, AND (&&) less than (<) 30. Notice the twin &&'s and that the entire condition is in brackets.
if (age == null || age == "" || isNaN(age)){
    document.writeln("You must type a number.");
}
The above statement specifies that the statement in the curly brackets will run if the age is null (has no value, eg. the user clicks "Cancel") OR (||) the age is an emtpy string ("", eg. the user clicks "OK" but with no value in the box) OR the user enters a value which is not a number. This final part is tested using the special in-built JavaScript function called isNaN() which returns true if the value in it's brackets is Not a Number (NaN).
This is to cover us for these eventualities, known in programming speek as Exception Handling. You may have noticed if you played around, that I didn't handle many exceptions on previous examples, to keep the code simple. Good programming, however is about covering those exceptions. Having said that I'm still not going to pay much attention to exceptions, if you want, you can have that as homework!
Note that conditions may be grouped together in separate brackets within the main brackets, for example the test above could also have been written:
if ( (age == null) || (age == "") || (isNaN(age)) )
This is probably not neccessary in this example but can make longer conditions easier to read.
If / Then statements are used to test for a certain condition, then do something (or not if the condition is not met). Often they are used in-conjunction with an else statement which specifies that if the condition is NOT met, then that which appears in brackets after it says "else" will be carried out.
It's coded like this:
if (some condition is true){
do something;
}
else {
do something else;
}
Note that the else part only runs if the first part (ie. the "do something") part does not.
Events and Event Handlers (top)
Whenever a user clicks on a link, or moves her cursor over one, JavaScript is sent a link event. This event is handled by an Event Handler. There are event handlers for all sorts of events in JavaScript, for example when someone submits a form. We'll see more of these later. One link event is called onClick, and it gets sent whenever someone clicks on a link, another link event is called onMouseOver, this one gets sent when someone moves the cursor over the link and finally onMouseOut gets triggered when someone moves off a link.
They're coded like this:
<a href="#" onClick="alert('Ooo, do it again!');">Click on me!</a>
<a href="#" onMouseOut="alert('Oh, don\'t leave me!');">Mouse off me!</a>
<a href="#" onMouseOver="alert('Hee hee!');">Mouse over me!</a>
The "#" in the link is there so clicking the link doesn't send it off trying to find a file. Note that the mouse event is not enclosed within the <script></script> tags. That's because these link events are now part of the HTML 4.0 standard. Finally, in the onMouseOut alert() , notice the strange little "\" character in the word don\'t. That's a useful little tool called an Escape Sequence similar to, say, " " in HTML for a space. Well, that "\" placed in front of a character causes JavaScript to ignore the character that follows it, which in this case was an apostrophe ('). Otherwise an error would have occured since JavaScript would have interpreted it as the end of the text string.
One of the most commonly used JavaScript features is to change images on the page without having to reload the page, this is called image swapping. The example is coded like this:
Firstly the initial image tag must look like this:
<img src="images/monkey.gif" name="the_image">
Notice that the image has a "name" attribute, this is neccessary to refer to the image space when we do the swap:
<a href="#" onMouseOver="document.the_image.src='images/sun.gif';">change</a>
The JavaScript command that performs the image swap, above, is this: document.the_image.src='images/sun.gif';. In this case it is written within the onMouseOver event handler (which is triggered when the mouse is moved over the word "change" in the link). It says that, the image source (src) for image named "the_image" (see the initial image tag) will change to 'images/sun.gif'.
Note that because the whole onMouseOver statement is enclosed in double "",s the quotes used to reference the image: 'images/sun.gif' must be single (') otherwise an error will occur. This is known as quote nesting. It would of course be perfectly valid to have the quotes the other way round, for example, the onMouseOver statement could be enclosed in single quotes and the image reference in double.
When doing an image-swap, the new image will only be called from the web server when the user triggers the swap event (ie. hovers on the link). This means there is invariably a delay while the new image is fetched from the server for the first time, making the swap not so smooth. You may have encountered that in the previous exercise. To get around that, the following code downloads all images into the browser's cache prior to the page being displayed:
if (document.images) {
   var blueUp = new Image();
   blueUp.src = "images/blueup.gif";
   var blueDown = new Image();
   blueDown.src = "images/bluedown.gif";
   var redClick = new Image();
   redClick.src = "images/redclick.gif";
}
It does this by first testing that the browser's Object Model (more on that later) supports images (most do, but Internet Explorer 3.0 doesn't):
if (document.images)
This if test returns true if the browser supports the image object and allows the rest of the code to run without error. The rest of the code creates a variable reference var imageObjectName = for each new image object new Image(). The new Image() is the code used to creates a new image object in JavaScript. Then we define it's source: imageObjectName.src = "images/imageFileName.gif";. Doing this actually causes the image to download into the browser's cache, and this gets executed before the rest of the page loads so it's ready for use.
More Complex Image Swapping (top)
This example shows a more complex image swap, where a selected image can be clicked on to replace another. First there's the image preloader which we've seen, then this:
//declaring some variables
var first = "images/sun.gif";
var second = "images/sky.gif";
var third = "images/thau.gif";
var store = "";
Some variables are declared as above. The last variable, store is not assigned any value, just "", this is so it can hold a changing value as we'll see. Next we have the body script:
<img src="images/sun.gif" name="top_image">
There is an image placed in the page called images/sun.gif and it is named top_image. Below this is another image named bottom_image which is also a link to "#" (which just enables us to put in a link without it having to call a file). The onMouseOver event in this link runs each time the mouse goes over the image in the link (initially, also images/sun.gif):
<a href="#" onMouseOver="store=first; first=second; second=third; third=store; document.bottom_image.src=first;" onClick="document.top_image.src=first;">The code in onMouseOver specifies that the variable store will become first (images/sun.gif), the variable first will become second (images/sky.gif), the variable second will become third (images/thau.gif) and finally, third will become store (which has been assigned first so is images/sun.gif). So, the images are all moving along one each time the mouse is hovered over them, with the store variable being a kind of start/end point for the rotation. After this, document.bottom_image.src=first specifies that the imaged named bottom_image (initially sun.gif) will be replaced by the variable first (src=first), so basically it means we see the results of the image change every time we mouse over it.
The code in onClick specifies that when we click the lower image it will replace the top one with whatever is in the variable first, ie. the image we have selected below using mouse over.
The Document Object Model (DOM) (top)
It's a good moment to mention the Document Object Model (DOM) at this point. The DOM is the way JavaScript describes Web pages, and it lies at the heart of all JavaScript programming. So, for example, document is an object referring to the content of the page, window is an object referring to the browser window. We've already been making use of some of these objects, now we'll look at them more closely.
Objects can have properties such as the object's background colour. For example the background colour of a window could be written like this:
window.document.bgColor = 'red';
It could also be written as document.bgColor = 'red';, this is because window is the default object and is assumed if it is not written. This could be used in conjunction with an onClick to change the background colour of this page like this:
<a href="#" onClick="document.bgColor='red';return false;">Make Me Red</a>
<a href="#" onClick="document.bgColor='white';return false;">Make Me White Again</a>
Try the links and notice the use of return false as part of the statement, this prevents the page reloading after the link is clicked, we'll see this more fully later on.
Here is an example of utilising the "status" property of the window object. Hover over the two links, move the mouse off and observe the bottom left of the staus bar:
Hover on Me!
And Hover on Me Too!
In case you can't find it, it should look like this:
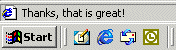
The script that produces this looks like this:
<a href="#" onMouseOver="window.status='Thanks, that is great!';return true;">Hover on Me!</a>
The effect of the above is to call up the property: status, of the window object and load into that property the text in quotes. Notice that in this link you must add return true as part of the statment. This is because otherwise the browser will perform it's own default action for this event - to display the URL of the link. Unfortunately, if you clicked the link, you probably got taken to the top of the page! JavaScript comes with a built-in library of objects more of which we'll come across later on.
As well as properties, objects have methods, these are actions that an object utilises. They are essentially built-in functions attached to objects. Here's an example that we used earlier:
var bold_both = both.bold();
in this example (remember Strings/Prompt Method, above),
bold() is a method of the object both which itself is a String Object. A
string object is created when you assign a string to a variable. In JavaScript,
strings are objects themselves, so bold() is a method of the String object.
The main difference with methods is that they are followed by parenthesis (),
that sometimes contain the parameters of the method. Note that they are accessed in the same way as properties, with
the object, dot, then the method. The parenthesis must be there even if they contain nothing.
We've already seen examples of the alert and prompt method. These in fact are methods of the window object and could have been written as:
window.alert ("This is an alert");
However, because window is the default top-level object, it can be left out as in our alert() and prompt() examples above. Another two methods of the window object are focus() and blur(), one brings a window to the front, the other pushes a window behind. However, in order to see it work we need a couple of smaller windows and to "invoke method calls" on other windows...
Communicating Between Windows (top)
Clicking the example above opens an HTML file (new.htm) in smaller window using the open() method of the window object like this:
<a href="#" onClick="window.open('new.htm','','width=400,height=300,resizable,left=0,top=0');return false;">Communicating Between Windows</a>
There'll be a thorough look at window manipulation next, but for now we're just concerned with the basics. Once the New Window opens, it itself opens an HTML file (little.htm) in a new window and makes a variable reference to that window (var little_window). The code to do this is here:
var little_window = window.open('little.htm','','width=200,height=200');
Notice how the variable little_window has been assigned to this instance of the newly created window object. Next up is some code to blur (send behind) that window using the blur() method.
// blur the new window
little_window.blur();
Notice how the blur() method is being applied to the variable little_window in the same way as to an object. Just as variables can contain numbers and strings, they can also contain references to objects. We can now "call methods" on the little window variable in the same way as we could on window, which is exactly what's happening above. So the little window drops behind the new window.
There is then some onMouseOver code to bring forward the little window using the focus() method:
<a href="#" onMouseOver="if(! little_window.closed){little_window.focus()};">Bring it forward</a>
and to put it back again using the blur() method:
<a href="#"
onMouseOver="if(! little_window.closed){little_window.blur();}">Put it backward</a>
Note that the command to focus or blur is preceeded by an if test: if(! little_window.closed), this is saying if the little window is not closed, since if the little window has already been closed, calling a method on it will generate an error. The self.close() method is used on the "Close Me" links, which is a shorthand way of writing window.self.close(). Finally, if you look at the code on the "Close Me" link you'll see I did something odd, I used the handy href="javascript: method. This is a way of writing JavaScript directly into a link. Always test this, though, as sometimes it has unexpected results. Here's how the "Close Me" link looks written that way:
<a href="javascript:self.close();">Close Me</a>
Window Manipulation In JavaScript (top)
Pages can be opened in a new window in HTML by using the target attribute eg:
<a href="newpage.htm" target="new_window">Click Here</A>
The problem with this method is that you have no control over the type of window that will be opened, whereas doing the same with JavaScript, you do. Here's how:
window.open("URL","name","features");
The above window.open() is a method call with parameters URL (the link), name, which is the named reference to the window (similar to target) and this can be re-used to link to that same new window. Note that the name parameter must be present in order for the new window to open, though it may be empty (ie. window.open ("URL", "", "features");). Then there's features, which sets various features to do with that window such as size, position, whether it can be resized etc. Features are optional and may be left out altogether as in this example:
<a href="#" onClick="window.open('newpage.htm','new_window');"> Click Here </a>
Notice that this gives us the same result as using target. Here are some examples of using the features part of the string with examples:
window.open('newpage.htm','window_name','location,menubar')
Gives a window with just the location box and menu bar.
window.open('newpage.htm','window_name2','location,width=500,height=200')
Gives a window that is a 500 pixels by 200 pixels with just the location window.
window.open('newpage.htm','window_name3','location,width=500,height=200,scrollbars,resizable');
Gives a window the same as above one except it is resizable and has scrollbars.
window.open('newpage.htm','window_name4','status')
window.open('newpage.htm','window_name5','toolbar,directories')
Shows Toolbar and Directory Buttons (Netscape).
In JavaScript, frames are treated the same as windows. Each frame inside a window is considered to be another window. They can be referred to using their name, and their hierarchies, ie. the "top" frame is the first one that contains other frames. The "parent" frame is a frame that contains another frame set.
In the above example, the link in the top frame reads like this:
<a href="#" onClick="top.target_frame.document.writeln('Thanks!<br><br><p>View Source to see JavaScript.</p><p><a href=index.htm#frame target=_top>Back to examples</a></p>');">Click Me!</a>
Notice that the onClick link refers to top to identify that the link reference starts in the topmost page in the frameset, that being the page that contains the frame data rather than the pages themselves (this in fact is the page called when you hit the "Frame Hierarchies" link, above. Then it refers to the name of the frame target_frame into which it is going to insert the contents of the document.writeln(), which forms the text content of the lower window.
Notice also that this text content is in a different font to the upper page. This is because the lower frame gets completely re-written by document.writeln(), even though it previously had a stylesheet link within it. If we'd really wanted to, we could have put that style link in with the rest of the text used in the document.writeln().
This example demonsrates the parent and top properties of the window object as also shows the location object.
This example uses the bgColor property of the document object, like this:
<a href="#" onClick="top.bottom_target.document.bgColor='lime';">
Notice the reference to the top of the window object, then the frame name and then the document object and the bgColor property of that object.
Loops are used to do similar things more than once. They perform tasks over and over, usually for a certain time limit or until a certain condition is met. They are an extremely powerful aspect of programming and a good grasp of them is essential for any programmer. They may well look baffling at first, but don't worry, they can be very confusing at first, but persevere, because they will start to make sense. We'll cover the main aspects of loops here, and start with an easy one...
The while loop keeps doing something "while" a certain condition is met, they written in this form:
while (some condition is true) {
execute these statements;
}
In the linked example, a password is requested before executing the rest of the page. It's coded like this:
//create variable
var answer = "";
while (answer != "password") {
answer = prompt("enter your password below: (hint: password =
password)","");
}
Notice the variable answer is declared with no value (this prevents a script error since the while loop refers to a variable (answer) which has not yet been given a value from the prompt(). So the above script states that while the response from the prompt is not equal (!=) to "password", is will run the prompt again, ad infinitum. Nice and simple.
In the previous example, the while loop ran for as long as the user didn't enter the word "password". In this example, we control the number of times the loop runs using a number, that being the number the user enters in the prompt. Each time the loop runs, we append the character "x" to a variable that contains a text string. First we ask the user for a number of x's using the prompt() method and store that number in a variable called number_x:
var number_x = prompt("How many x's would you like? (1-10 is good)","5");
We then need to use this number to create a line of x's. But first we need to define a couple of variables for our loop:
var the_x_string = "";
var counter = 0;
The variable the_x_string will store the series of x's, and the variable counter is going to be used as a means of checking how many times the loop has run, and is initialised at 0. Next, we run the loop:
while (counter < number_x) {
the_x_string = the_x_string + "x";
counter = counter + 1;
}
This says that while counter (which is 0, initially) is less than (<) number_x (which is the number of user-entered x's) it will run the curly bracket code which will add an "x" to the the_x_string variable and add 1 to the counter variable. That's in these lines:
the_x_string = the_x_string + "x";
This says that the the_x_string is equal to itself plus an "x", so each time the loop runs the string of x's
grows by 1.
counter = counter + 1;
This increments the counter by one each time the loop runs. This will
continue until counter is is equal to number_x at
which time the_x_string will have as many "x"'s as the user entered
and the loop condition will no longer be true (ie. counter is no longer
less than number_x), causing the loop to
immediately exit and the next piece of code to run:
alert (the_x_string); Which brings up an alert diplaying the the_x_string.
Now I'll show you a couple of handy programmer's shortcuts to make the above code a bit shorter. Firstly, we could have written this line: the_x_string = the_x_string + "x"; like this:
the_x_string += "x";
This make use of the += operator which says "add something to myself", in this case, an x. This operator also be used with numbers ie. if you have a variable a_number = 3; and you do a_number += 2;, a_number would become 5.
Next, we could have written this line: counter = counter + 1; like this:
counter ++;
This shortcut makes use of the ++ operator which says "add one to myself". Of course we could also have written it as: counter += 1;. All of these different ways of doing things may seem a bit confusing, and I showed you the long way first so these short methods were easier to understand. As with many aspects of computing (and life!), there are many ways of achieving the same thing. However, don't get too hung up on writing the most efficient code, the important thing is that your program does what you want, and is easy for you and others to understand at a later date. Leave the optimisation to later.
The for loop is a little trickier to understand, but once you do, you'll probably use it more than it's while brother. That's because it's a bit more convenient to use and quicker to write. It's written in this form:
for (initialise counter; test
; increment counter){
do this stuff;
}
In our linked example, I used a for loop to produce a similar result to the previous while loop example, except I output the result to the page instead of an alert() to make it a bit more interesting. Essentially, though it does exactly the same job as the last example, in which, you'll remember that we had to create and initialise a special variable to count the iterations of the loop, increment that counter and evaluate a condition, all on various different lines of code. With the for loop, all of that is taken care of in the brackets after for. Here's how the example is coded:
var number_x = prompt("How many x\'s would you like? (1-10 is good)","5");
var the_x_string = "";

for (var counter=0; counter < number_x; counter++){
    the_x_string += "x";
}
alert(the_x_string);
Here's how it works, moving straight to the loop:
for (var counter=0; counter < number_x; counter++){
After the for keyword, we have the stuff in brackets. First, we initialise the counter variable: counter, as 0. That doesn't mean it gets initialised each time the loop runs, otherwise it would run forever! Think of the stuff in brackets as "setting up" the loop. Next is the test, which is the same as in our previous example, ie. the loop runs when counter is less than number_x. Then, we increment the counter, using counter++. Finally we have the building of the "x" string as before and the alert(). And that, is essentially a for loop.
A nested for loop is simply a for loop within a for loop. It works like this, the first, enclosing loop starts up, and upon it's first iteration, it encounters a another loop, this is the nested loop, enclosed within the enclosing loop. The nested loop then completes all of it's iterations, and exits. We then move back to the first, enlosing loop which moves onto it's second iteration and the whole process begins again until the enclosing loop is finished. You can have as many nested loops as you like. Here's how the linked example is coded:
var width = prompt("How wide do you want the grid? (1-10 is
good)","10");
First we get a value for many x's wide the grid will be
var height = prompt("How high do
you want the grid? (1-10 is good)","10");
Then we get a value for how many x's high the grid will be.
var the_x_string = "";
And declare an empty variable to hold the x's.
The above part is coded in the head of the document. The rest occurs in the body of the document:
for (height_loop = 0; height_loop < height; height_loop++) {
	the_x_string = "";
This is the first loop, I'll call it the height loop, and it is going to run as many times as the user's entered value for the height of their grid. The first thing to happen in this loop is that the variable holding the text string, the_x_string gets re-initialised back to empty. I'll explain why that is later. The next thing to happen is the nested loop, I'll call it the width loop:
 		for (width_loop = 0; width_loop < width; width_loop++) {
	    	the_x_string += "x";
	    	}
I've deliberately indented the width loop code to show that it occurs within the height loop (it's a good idea to write your own nested loops this way so they're easier to read). This loop is going to run as many times as the user's enetered value for width. Within this loop, a row of x's will be built up in the variable the_x_string in exactly the same way as in our previous loop example. Only when this loop is completely finished do we move back into the enclosing height loop's curly brackets or execution context:
	document.writeln(the_x_string + "<br>");
}
whereupon, a row of x's is written to the document along with an html line break. After that, the first iteration of the height loop is complete and it's time to move onto it's second iteration. You can now go up two paragraphs and re-read back to here to find out what happens next, exactly the same thing, until the height loop is finished. This is how the grid of x's gets written. I did say I'd explain why the variable the_x_string gets re-initialised back to empty, it's because otherwise the string of x's will have all the x's from the previous iteration of the loop. If you want, comment out that line from the example and you'll see what I mean.
Another For Loop (homework) (top)
I think it's time you had a little homework ;-), so here's a another for loop for you, which I'm not going to explain. This example uses a few different things we've covered and your job is to figure out how it works and see if you can get the words to output in the right order instead of in reverse order. Have fun!
We've seen that variables can hold numbers, strings, and references to objects. There's another kind of information that JavaScript understands: arrays.
Arrays are lists. You might have a list of URLs that you want to visit, a list of numbers that you want to remember, or a list of colors in which you'd like text displayed. All these lists can be stored in arrays.
In the linked example I create an array of colours like this:
var colours = new Array ("Red", "Green", "Blue");
Having created the array, we can access elements within that array by number, known as the array index. Note that the index starts at "0". In the example, the link:
<a href="javascript:alert(colours[0]);">colours[0]</a>
was used to alert() the word "Red", that being element 0 in the array. Having created an array, we can add to or change it's values. In the example we change "Red" to "Orange" like this:
colours[0] = "Orange";
Note that arrays can contain numbers as well as text, or both, for example, an array could look like this:
var months = new Array (1, "Jan", 2, "Feb", 3, "Mar");
Arrays are often used in conjunction with loops because you can loop through each element of the array and grab it's data. In the above example, each click sets the background colour of a page to a colour in the array. It works like this, firstly an array is made of four colours:
var colours = new Array("#FFCC33","green","blue","white");
This array is created in the head of the document. Note that we've used a combinaion of html hexadecimal code and colour names in our colours array.
Next, I've placed some JavaScript after the </body> tag in the document. You might be wondering why I didn't add this code after the array, above. Well, in some browsers, they need the body content to be loaded before you can mess with it's properties which is what we're going to do. So, in this code I'm going to start a loop:
for (var loop=0; loop < colours.length; loop++)
Now, we've already seen a for loop, but there's something interesting to note here. In the loop test condition, I'm saying "keep running the loop while the counter (loop) is less than the number of elements in the array": loop < colours.length;. To get the number of elements in the array, I'm using it's "length" property. I can do this because essentially, arrays are objects, and thus I can get properties off them such as : object name.length;, which returns the number of elements, in this case the colours (4), in the array.
So, each time the loop runs, an alert() is displayed (so you have time to see each colour):
alert("Click to see the next colour...");
Then the background colour of the page is changed using the bgColor property of the document object, setting it to one of the elements in the colours[] array using the the current loop count as the array index: colours[loop];:
document.bgColor = colours[loop];
So, the first time the loop is run, loop is 0, so that corresponds to "#FFCC33" (the first element) in the array. The next time the loop runs, loop is 1 and this corresponds to "green" in the array and so on until we've looped through all the colours in the array and the loop is finished.
The DOM has many arrays built into it. In the above example, when choosing which image to swap, it is not based on an image being "named" like in our previous image-swap examples, but rather on the position within the HTML document using the built-in document.images[] array. In the example, here is the code under the link "Change":
<a href="#" onClick="var change = prompt('Which image would you like to change? (Choose 1-5)','');document.images[change-1].src = 'images/' +change+ 'a.gif'; ">Change</a>
Firstly, following the onClick, the variable change gets loaded with the user input (number 1-5) from the prompt(). OK we've seen all this stuff before, but what is new is the code after this (note that multiple statements can be used in an onClick provided they are separated by ";"):
document.images[change-1].src = 'images/' +change+ 'a.gif';
Now, this is a bit tricky, so we'll take it bit by bit. Remember I said that the DOM has a number of arrays built in? Well, one of them is the document.images[] array and is an array just like the ones we used above. This array, along with a few others gets created by JavaScript when the page loads, and contains a reference to all the images in the page. So for example, document.images[0] refers to the first image in the page, document.images[1] to the second (remember the array indexing starts at 0) and so on. So, we can make use of this array, to find out stuff about the images, and maybe change them.
In this case we're going to change the image. We tell JavaScript which image to change in this bit:
document.images[change-1]
Here, we're using the user-entered variable change as the array index. We have to subtract 1 from it (change-1) since the array starts numbering at 0. So if the user entered "3", this code now translates to: document.images[2] which in the page refers to the "3" image. All a bit confusing I'm sure, but bear with me. So we're referring to the appropriate image object, next we're going to change it's src property as we did in the image swapping exercises:
.src = 'images/' +change+ 'a.gif';
In this bit, we're saying what the source of the image should be. The first bit after the = is a text string, 'images/' pointing to the images folder, then we pop in the value of the change variable, note the use of the + operators when mixing variables and text strings, finally we append the 'a.gif' to the image name, this is because I named the red versions of the numbers with an "a" after the number eg. "3a.gif". So, is the user entered "3", the image source translates to: 'images/3a.gif';, and so the red image appears.
As a footnote, I probably wouldn't recommend swapping images in this way, since if you add a new image to the page, you have to keep track of your images array and ammend your code accordingly as the array index would have shifted by 1. It's probably better to use a named image as we did in the image swapping excercises as that is unaffected by changes to the page. However, the document.images[] array and those like it can be very useful, especially when looping through all the images in a document for some reason.
Functions, or subroutines, as they're sometimes called, are bits of JavaScript that you can call over and over without having to rewrite them every time. They come in this format:
function functionName (parameter list) {
statements ...;
}
Note the keyword function, followed by the function name. The naming conventions are the same as for variables, the first character must be an underscore or letter. You must not name a function the same as a variable or there'll be strange results, therefore it can be useful to use a different naming convention such as internal capitalisation (internalCapitalisation) for functions and underscores (variable_name) for variables, to avoid clashes.
After the function name, come the brackets ( ) which can contain parameters, which are additional values that can be passed into the function, but these we'll come onto that later, but note that even if the function has no parameters, those brackets must still be there. Then there's the code statements, contained within curly { } brackets. You can then call your function, ie. get it to run, like this:
functionName (parameter values);
OK, enough theory, lets go through the example above, line by line, first we name the function, announceTime(), notice it has nothing between the brackets which means it has no parameters:
function announceTime() {
Next comes the body of the function between the {}'s. This is what is run each time the function is called. First a variable the_date is created to reference a new Date() object. This is one of the handy built-in JavaScript objects, which when created, is automatically set to the current date and time from the user's computer:
var the_date = new Date();
The new Date() object returns a string of the current date and time, however if you want to be more
specific and get say, just the minutes, or seconds, you have to call other methods on it. So the next lines
call these built-in methods getHours(), getMinutes()
and getSeconds()on the new Date():
var the_hour = the_date.getHours();
var the_minute = the_date.getMinutes();
var the_second = the_date.getSeconds();
Finally, we create a variable the_time composed of the hour, minutes and seconds, separated by :'s and show that as an alert():
var the_time = the_hour + ":" + the_minute + ":" + the_second;
alert("The time is now: " + the_time);
}
The function is then called by the link in the page:
<a href="#" onClick="announceTime();">Click me to get the time!</a>Here's a good time to point out one of the advantages of functions. You'll see here that the onClick calls a function, whereas in our previous examples I embedded the actual code within the onClick. I did this for simplicity, but more often than not, it's cleaner to embed a function call in the onClick and place the code in that function. Also, that means if the code is called on more than one link, you don't have embed the same code in each link, you simply call the function again. Then if you decide to change the action of the onClick code, you only have to do it in one place (the function) rather than on each link.
You may have noticed that in our example, if the seconds or minutes less than 10, then it will display something like 10:8:4 instead of 10:08:04. This is because the getMinutes() and getSeconds() method return whole numbers. We'll see a way round this using Parameters, next.
Parameters & Return Values (top)
The linked example fixes the minutes and seconds problem (above) which you'll see on a time whose minutes or seconds are less than 10. It does this using an additional function called fixNumber(the_number) that adds a "0" in front of a number less than 10. However it could have been done by integrating some new code within the original announceTime() function, above, like this (original code in grey):
var the_minute = the_date.getMinutes();
if (the_minute < 10) {
the_minute = "0" + the_minute;
}
var the_second = the_date.getSeconds();
if (the_second < 10) {
the_second = "0" + the_second;
}
The thing with this, although this would have worked fine, we have basically written the same "adding a zero" code twice, once for the minutes and again for the seconds. If this is the case, it is usually better to write a separate function. Also, the "adding a zero" function could potentially be used for something else. This kind of coding methodology is called modular coding, which basically means that you try and separate individual tasks into individual blocks or modules of code. OK, let's look in detail at the fixNumber(the_number) function:
function fixNumber(the_number) {
First we get the function keyword and name which we've seen, but in this example there is a "parameter" the_number in the brackets after the function name. A parameter is basically a variable that can be used within the function, and you give that parameter a value when you call the function as we'll see further down. In this case the_number is the number that we want the function to add, if neccessary, a zero in front of. Next is an if statement which tests if the the_number is less than ten and adds a zero to the front of it if it is:
if (the_number < 10) {
the_number = "0" + the_number;
}
return the_number;
}
Notice the line return the_number; used here. The return statement is used to "return" a value from the function and terminate the function. In this case it returns the value of the_number. If there is no expression after the return statement, it simply terminates the function without returning a value, regardless if there are any more lines of code in the function. This can be useful, for example after an if test, the function is no longer relevant you can simply return; to terminate it.
OK, so when and where does the function fixNumber(the_number) function get called? Well, it's called from within the original announceTime() function as follows (original code in grey):
var the_minute = the_date.getMinutes();
var fixed_minute = fixNumber(the_minute);
var the_second = the_date.getSeconds();
var fixed_second = fixNumber(the_second);
So this is where we pass the parameter value into the function fixNumber(). We're passing in the the_minute and the_second respectively. So, for example the function call fixNumber(the_minute); would translate, if the current minute was 4 to fixNumber(4);. In turn, the actual function itself function fixNumber(the_number) would translate to function fixNumber(4). It would then do it's stuff, and return "04", so var fixed_minute = "04".
Finally the_time variable is created except using the fixed minutes and seconds instead of the unfixed ones
and are then displayed by the alert:
var the_time = the_hour + ":" + fixed_minute + ":"+ fixed_second;
alert("The fixed time is now: " + the_time);
}
Functions With More Than 1 Parameter (top)
The idea of this example is to demonstrate a few of the items we've already covered, and show a function with more than one parameter. The function compares two arrays and gives a list of the common elements of both arrays in an alert. The parameters of the function are: what to call the results of the comparison (common_name) and which two arrays are to be compared (array_1 and array_2). Here's the code in the example, firstly two arrays are defined:
var small_fishes = new Array("Cod","Mackerel","Goldfish","Trout","Prawn","Shrimp");
var sea_fishes = new Array("Shark","Cod","Mackerel","Octopus","Shrimp","Prawn");
Next comes the function to find fishes common to both arrays and display them as an alert. The function is named, and three parameters are defined in brackets following the function name, remember, the parameters are used when the function is called upon which we'll see later. Here's the start of the function:
function commonArrays(common_name, array_1, array_2) {
Next, a variable is defined with no value, for use in the function:
var common_elements="";
Next up there is a for loop like we've seen before. It's going to iterate through all the elements in array_1 (in this case small fishes):
for (var loop_1 = 0; loop_1 < array_1.length; loop_1++) {
Each time it comes across a fish, it's going to enter another, nested loop. In this loop, it's going to iterate through all the elements of array_2 (in this case, sea fishes) and see whether any of these sea fishes has the same name as the small fish from the enclosing loop:
for (var loop_2=0; loop_2 < array_2.length; loop_2++) {
If it is the same, it will add that fish's name to the variable common_elements:
if (array_1[loop_1] == array_2[loop_2]) {
common_elements += array_1[loop_1] + ", ";
}
Notice the square brackets [] after each array name referring to the index in the array, that being the value of the current loop (loop_1) and (loop_2) respectively. Once the common fish is found, it's name is taken from the first array and loop common_elements += array_1[loop_1] however, it could have just as well have been taken from the second array and loop as that is referring to the same fish, eg. common_elements += array_2[loop_2]. You may be wondering what the +", "; at the end of the middle line, above. That's to add a comma and space after each fish.
Once it's gone through the sea fish (array_2), it exits the loop and moves onto the next small fish in the enclosing loop and repeats the process until it's gone through all the fishes in array_1. So now, the common_elements variable should contain all fishes common to both arrays.
Now comes the time to display the common elements (fishes) from the arrays. Now it's important to remember that the function commonArrays simply compares arrays and displays the items which are common. It does not know, or care, whether the arrays contain cars, trees or whatever. So, the function has another handy little parameter called common_name. This is simply a way of passing in a text label for our results:
alert (common_name + " are:" + common_elements);
In this case common_name is the text "Small Sea Fishes". Finally let's look at where the function is called from the hyperlink in the page:
<a href="#" onClick="commonArrays('Small Sea Fishes', small_fishes, sea_fishes);">Which are Sea Fishes that are Small ?</a>
The function is called from an onClick event handler. Notice after the function name commonArrays, there are the three parameters in brackets, separated by a comma. So 'Small Sea Fishes' becomes common_name (which is used in the alert), when it's passed to the function, notice it's a text-string. Then small_fishes refers to the array defined above and so doesn't need to be in quotes, this becomes array_1 in the function. Finally sea_fishes is passed in and becomes array_2. Note that the number of items defined when the function is called must be equal to the number of parameters in the function, otherwise there will be erroneous results.
Forms are part of HTML specification 1.0 and so are not a JavaScript "thing", however they can be manipulated and used extensively by JavaScript. These next exercises assume some basic knowledge of how form fields are created in HTML.
OK, here's a basic form:
This form was created like this:
<form name="a_form">
<input type="text" name="first_text" size="40"
value="Here's some text in a form field">
</form>
This is all HTML, however, the form and it's elements can be referred to by JavaScript using the DOM in one of two ways, either by the document.forms[] array:
var the_form = document.forms[index_number].elements[index_number]
or using the form name property defined in the opening <form> tag:
var same_form = document.form_name.field_name
Using the document.forms[] array method, the forms in the page are addressed by a sequence number, eg. document.forms[0] refers to the first form in the document, document.forms[0].elements[1] refers to the second element in the same form, similar to the document.images[] array we saw earlier. Using the named form method, var same_form = document.form_name.field_name, we refer to a specfic named form and element.
In this the example the form looks like this:
<form name="another_form">
<input type="text" name="the_text" size="40"
value="How are you today?">
<input type="reset"
value="Reset">
</form>
Then, the links are just regular mouse-overs except they reference parts of the form like this:
<a href="#" onMouseOver="
document.forms[1].elements[0].value='That is Great!';
">Feeling Fine!</a>
<a href="#" onMouseOver="
document.another_form.the_text.value='Ohhhh....CheerUp!';
">Feeling Grumpy!</a>
Both links are addressing the same form and element, but in different ways. In this case, we're addressing the form field's value property. There are other properties we could address, for example the name of the form element could be changed like this:
document.form_name.field_name.name='new_name';
or like this:
document.forms[index_number].elements[index_number].name='new_name';
Again we're using the DOM to reference the item we want. Which method to use depends upon the circumstances. In most cases it's more reliable to use the named form/element approach as the array method can go wrong if forms are added/removed from the page. On a dynamically generated page where you always want to address, say the third form, then the array method is better, or perhaps you need to know the number of forms in a page which you can get from the forms.length property. Either way, knowing both methods gives you maximum flexibility.
This example is basically the same as the above ones except the form field is a textarea:
<form name="big_form">
<textarea rows="4" name="textfield"
cols="67"></textarea>
<input type="reset" value="Reset">
</form>
Also we use an onClick and notice how it refers to a variable rhyme rather than a string:
<a href="#" onClick=" document.big_form.textfield.value = rhyme; ">The Rhyme</a>
That variable containg the rhyme was defined in the head of the example document:
var rhyme = "The Grand Old Duke of York\nHe had ten thousand men\nHe marched them up to the top of the hill\nThen he marched them down again.";
Notice the \n's, the escape sequences for inserting s line break.
Text fields understand the onFocus, onBlur and onChange events which are demonstrated in the above example. The code to produce them looks like this:
<input type="text" name="line_1"
onFocus="updateText('You Clicked INSIDE!');
"
onBlur="updateText('Then Clicked OUTSIDE!');
"
onChange="updateText('You ENTERED Something!');">
Notice that each event handler is calling on the funtion updateText() and passes a parameter (message) to that function with a text string eg. 'You Clicked INSIDE!'. Here's the function:
function updateText(message) {
var message_break += "\n";
document.funky_form.line_2.value += message_break;
}
The function generates the text that appears in the bottom text box whenever the user clicks inside, outside or changes the top text box. We've seen event handlers before, in this case they're assigned to the top input box. One you might not have seen is onChange, as the name suggests it gets generated when the content of the item changes. It's important to realise, though, that onChange only actually gets generated once the user performs another action, eg. clicks outside the box.
The function is passed the parameter message, which is used in the lower text field. First, though, the message gets a line-break added to it in the line: var message_break += "\n";, this is so that each message appears on a new line in the lower text field. Then the DOM is used to update the lower text field, in the same way as I updated the text field above.
So far, we've seen a properties of text fields and textareas and some events that they can handle. The remaining thing to know about these elements is some JavaScript methods that can be applied to them: blur(), focus(), and select(). Let's see them:
Hover to Focus - uses
focus() method to place cursor in the text field.
Hover to Blur - uses
blur() method to remove cursor from text field.
Hover to Select - uses
select() method to select contents of text field (may not work in Navigator).
Here is the html to create the form:
<form name="method_form">
<input type="text" name="method_text" size="20"
value="Watch This Space">
<input type="reset"
value="reset">
</form>
And here is the code in the links:
<a href="#" onMouseOver="document.method_form.method_text.focus();">Hover to Focus</a>
<a href="#" onMouseOver="document.method_form.method_text.blur();">Hover to Blur</a>
<a href="#" onMouseOver="document.method_form.method_text.select();">Hover to Select</a>
Calling methods on a text field is just like accessing the methods of any object: object_name.method_name(). The name of the form above is method_form. The name of the text field above is method_text. So, to call the focus() method on the text field above, we call:
document.method_form.method_text.focus();
Forms are objects; they have their own methods, properties, and event handlers. One event handler that you should know about is onSubmit. This event gets called upon in two situations, when a user hits a "Submit" button in a form or hits the "Return" key in a form field. If these events are not "handled" unwanted things can happen. Try this one for example:
You should have seen that the page got reloaded, which was a pain as you would have been right at the top again. Now try this one:
This one should not have done anything due to the onSubmit in the form tag looking like this:
<form onSubmit="return false;">
Generally, return false is a way of stopping your browser doing what it would normally do. It can also be used in the onClick part of a link, eg. <a href="file.htm" onClick="return false;"> Link</a>. This link should do nothing.
This example demonstrates a classic example of form validation. JavaScript checks that the user has entered something in the form before submitting it back to the server. You've no doubt come across this kind of form validation on the web. It's useful because it's much quicker than having to send all the form back to the server, only for the server to decide you've filled in the form incorrectly, build an error page and send it back to you. JavaScript does it all on the user's machine. However, for very important validation, such as credit card validation, it's useful to have server validation in backup in case the user has disabled JavaScript.
The example makes use of the onSubmit/return false routine used above. OK, first the form, it's all fairly standard except for the opening form tag, so let's just look at that in detail:
<form name="handled_form" action="index.htm#formvalid" onSubmit="return validateForm(this);">
The form's action attribute wants to take us right back to the tutorial, however, standing in it' way is an onSubmit event handler. Now, you'll remember in our previous example, submitting a form whose onSubmit equals return false means the form doesn't do anything. Well here, the handler's return statement is going to be decided by a function called validatForm(). This function will either return true or false, allowing the form to submit, or not. To be or not to be, that is the function. Now, here is a new bit of JavaScript, it's the very handy this keyword. Put simply, the this keyword refers to an object, that object being the one in whose context the keyword is used, so in this example, it's actually referring to the form handled_form. So it's the same as writing: onSubmit="return validateForm(document.handled_form) except it's shorter, which is nearly always a good thing. OK let's see the function:
function validateForm(form){
The first line shows the function name and the parameter form, referring to the form object, in this case handled_form, which was passed using the this keyword. Next, we then refer to a specific field, handled_field in an if statement and check whether it's value is empty:
if (form.handled_field.value == ""){
If it is empty, we do this:
	alert("You must first make an entry in the form...");
	form.handled_field.focus();
	return false;
	}
We put up an alert() to tell the user what the problem is, we put the cursor back into the appropriate field to show the user which field we're talking about, using the focus() method, and finally we return false back to the form's onSubmit event handler so that the form is not submitted. If the field isn't empty, ie. the form is validated, we return true back to the form's onSubmit event handler and the form gets submitted:
	else{
	return true;
	}
}
And there ends the function.
Checkboxes are used in forms to choose multiple items, a bit like multiple selects. They consist of a name/value pair, and when the item is checked, that name/value gets submitted with the form. Here's an example:
They're coded like this:
<input type="checkbox" name="item_1" value="eggs"> EggsCheckboxes have one main property of interest in JavaScript: checked. If you have a form named the_form and a checkbox named the_checkbox you can see if the checkbox has been checked like this:
if (document.the_form.the_checkbox.checked == true) { do stuff...
In our example we use the checkIt() function, invoked from the the link to do the above. Here's the function:
function checkIt(){

if(document.checkform.checkbox.checked == true){
	alert('Yup, it is checked!');
	}
	else{
	alert('Nope, it is not checked.');
	}
}
So a different alert is displayed depending on whether the checked property of the checkbox is true or not.
In the same way that you can check the checked property of a checkbox, you can also set the checked property of a checkbox like this:
document.checkform.checkbox.checked = true
The example uses the same form code as the previous example, so let's just look at the links:
<a href="#"
onClick="document.checkform.checkbox.checked = true;
return false;">Click to check the box</a>
The code in the onClick here sets the checked property of the checkbox to true, making a tick appear in it's box. Note here that the true keyword used here is a built-in JavaScript keyword, and not a variable name.
<a href="#" onClick="document.checkform.checkbox.checked = false; return false;">Click to uncheck the box</a>
The code in the onClick here sets the checked property of the checkbox to false, making the tick disappear from it's box. Again, the false keyword used here is a built-in JavaScript keyword.
<a href="#" onClick="alert(document.checkform.checkbox.checked); return false;">Click to see if checked</a>
The code in the onClick here opens an alert. Notice here, that in the brackets of the alert, we've simply put the line: document.checkform.checkbox.checked. JavaScript then checks this property and returns either true or false, and that forms the text displayed in the alert.
Radio buttons are used for single-choice options a bit like single-selects. This is achieved where the name part of the radio button tag is identical to another radio button. Thus the name is always the same, but it's the checked option whose value gets submitted. Here's an example:
They're coded like this:
<input type="radio" name="choice" value="yes"> YesNotice that choosing one option cancels another and that once an option is chosen, you cannot deselect, only select something else (unless you refresh or reset the form). Radio buttons and checkboxes utilise the various event handlers, the more useful of which is probably onClick. Here's an example:
They're coded like this:
<input type="radio" name="choice" onClick="document.bgColor='#000000';"> Lights Off
Like checkboxes, checked radio buttons also have a checked property, so we can use JavaScript to find out which item a user has checked as the example shows. However it's a bit more tricky with radio buttons to get the checked item, here's why:
<form name="my_form">Above is the form used to produce the radio buttons in the example. Now, if we used the same technique to find the checked item as we did with checkboxes eg.:
if (document.my_form.my_radio.checked == true)
JavaScript would go "Eh?", well not exactly, it would say "undefined". This is because there are 3 elements with the name my_radio, since radio buttons share the same name. JavaScript doesn't know which element we're talking about. Luckily for us, however, the DOM makes radio button groups into arrays, so we need to loop through that array to find out which is checked. In the example I do that with a function called checkChecked(), here it is in detail:
First there's the function name and a variable called got_one set to false, I'll come back to that later:
 function checkChecked(){
var got_one = false;
Now we start a loop:
for (var loop=0; loop < document.my_form.my_radio.length; loop++){
You may remember from the arrays exercise that you can call .length on an array, which returns the number of items in that array. That's what I'm doing above, I'm looping through the length of form elements called my_radio, which is 3. Next, for each radio button we're going to see if it's checked:
if (document.my_form.my_radio[loop].checked){
Notice we're still using the checked property, but this time on an index of an array ie. my_radio[loop]. If we find one checked, here's what we do:
		got_one = true;
		alert(document.my_form.my_radio[loop].value + " is checked!");
		break;
		}
	}
We set the variable got_one to true, which we'll use in a tick, then we alert the value of the checked item, and finally we break from the loop. We've not yet encountered the break statement, but it's a handy little statement used in loops. What it does, is simply terminate the loop, regardless of how many more items there are to loop through. This is useful in cases like this, because there will be no more than one radio button checked, once we've found it we don't need to keep looping. This allows our program to get on with other things and makes it more efficient.
Finally we're out of the loop and back into the main body of the function:
if (! got_one){
	alert("None are checked!");
	}
}
This is where we make use of the got_one variable. What we're saying here is if got_one is false (if (! got_one)), then alert that none are checked. You'll remember that got_one was initialised as false, and it would only have been redfined as true, if a checked item was found. As a footnote, checkboxes are also formed into exactly the same kind of array as radio buttons, however since checkboxes are normally used with individual names, there's no need to use the array.
Selects are usually used to select one item from a list, or multiple items using Ctrl+click if the multiple keyword is used in the select tag. In the example, the select in the form is a single select and coded like this:
<form name="select_form">
<select name="foods" size="4">
    <option value="10">Bread</option>
    <option value="20">Eggs</option>
    <option value="30">Cheese</option>
    <option value="40">Fish</option>
    <option value="50">Milk</option>
    <option value="60">Bananas</option>
</select>
</form>
All the options in selects, like radio buttons, are formed into an array by the JavaScript DOM. Their values are accessed like this:
document.form_name.select_name[array_index].value
However, select options not only contain values, but also text strings. For example, the value of the Bread option, above, is 10, but it's text is "Bread". Let's look in detail at the links in the example:
<a href="javascript:alert(document.select_form.foods[2].value);">What's the value of Cheese?</a>
Here we're trying to get the value of cheese. Cheese is index [2] in the foods array, so we reference that and get it's value, which is 30.
<a href="javascript:alert(document.select_form.foods[3].text);">What's the text of item 4?</a>
In this link we're pulling out the text of an item instead of it's value, in this case, it's Item 4, which is index [3] in the foods array.
<a href="javascript:alert(document.select_form.foods.length);">How many items in the select?</a>
Here we're finding out the number of options in the select, by querying the length property of the foods array.
<a href="#" onClick="document.select_form.foods[3].text = 'Space Shuttle';">Change the Fish into a Space Shuttle!</a>
As well as reading these properties, we can also write them, here we're changing the text of index [3] in the foods array, from "Fish" to "Space Shuttle".
So far we've accessed text and values of select options using their index in the options array. However, often you want to know which option a user has selected. For this, there is the handy selectedIndex property of the options array. It's value can be accessed like this:
document.form_name.select_name.selectedIndex
This property returns the index number in the array of the selected option. If nothing is selected, it returns -1. The example uses the same form code as the previous example. Let's look at the links in the example:
<a href="javascript:alert(document.select_form.foods.selectedIndex);">What's the selectedIndex?</a>
This link returns a number, for example if "Bread" is selected it returns 0. If nothing is selected, it returns -1. Once we've ascertained the selectedIndex, we can use it to query the text and/or value of the selected option, that's what we're going to do on the next links:
<a href="javascript:getSelectedValue();">What's the value of the selectedIndex?</a>
This link calls a function to get the selected value. It's easier this way as there's a few lines of code to get the value, here's the function:
function getSelectedValue(){

var the_foods = document.select_form.foods;
var the_index = the_foods.selectedIndex;
The two variables, the_foods and the_index here are just to make the function easier to write later on. It's a good idea, if you are going to be using fairly long object/property calls, to shorten them to variables like this.
if (the_index != -1){
	alert("The selected value is: " + the_foods[the_index].value);
	}
Here, we're saying, if something is selected, alert it's value. The way we test if something is selected, is by seeing if document.select_form.foods.selectedIndex (now referred to as the_index) is NOT -1, remember it IS -1 when nothing is selected. Here we can see the benefit of using the_index variable, since we use it again in the alert. If the_index is -1, we alert accordingly:
	else{
	alert("Nothing is selected");
	}
}
The link to show the text of the selected item uses a similar function called getSelectedText(), but alerts the text property of the selected item rather the value property. Finally, the last link:
<a href="#" onClick="document.select_form.foods.selectedIndex = 2;">Select me some Cheese!</a>
As well as querying the selectedIndex, we can also write it. That's what this link does, it sets the selectedIndex to 2, and in so doing causes the "Cheese" option to be selected.
The selectedIndex works fine on single-selects, but what about forms where you can select more than one option as in our example? If you call selectedIndex on a select which has the multiple attribute in it's select tag, and the user has Ctrl+clicked more than one item, selectedIndex will return the index of the first selected item it finds. So, in multiple selects, you need to loop though the options and test for the selected property of the option like this:
document.form_name.select_name[array_index].selectedThis property will return true if the item is selected or false if it is not. I won't go through the function used in the example since it's very similar to other functions we've been through, however I am absolutely certain it's child's play for you now!
Here's a quick summary of the stuff we've covered in JavaScript and Forms:
eval() is a very useful JavaScript method. It is basically used to "evaluate" whatever is passed to it. In our example, I used a function to add 7 to a form field. If we started with 2 and added 7, without eval(), we would end up with 27, which is literally 2, with seven plonked next to it. That's because even though a number was entered in the form, JavaScript sees that as a text string, and when the + operator is used with strings, it concatenates (joins) them. Using eval(), evaluates the contents of the field and turns it into a number instead of a string, eg. 2 becomes the value 2 rather than the character 2, therefore when we add 7 to it, we get 9. Here's how the example "Adding a number WITH eval()" works:
function evalFunction() {
var the_value = eval(document.evaluate.number.value);
In the first line of the function we pass the value of the input field number
from the form called evaluate to eval()and
make it the variable the_value. Thats means that the_value
equals the numeric value of a number character the user entered.
document.evaluate.number.value = the_value += 7;
This line updates the same form field after adding 7 to it. The function used in the
example "Adding a number WITHOUT eval()",
is exactly the same, except that the field value is not passed to eval().
eval() can also be used to evaluate a text string and evaluate it into a variable, if one exists. In the example, "Entering a variable name WITH eval()", typing the words "cats", "cars" or "trees" into the field and hitting "Process" produces a list of those items. This is because some variables were set in the header of the document like this:
var trees = 'Fir, Oak, Birch, Maple, Ash';
var cats = 'Tabby, Siamese, Tiger, Lion';
var cars = 'Mini, Golf, Mercedes, BMW';
Then, the function goes like this:
function evalFunction2() {
var the_word = eval(document.evaluate3.word.value);
document.evaluate3.word.value = the_word;
}
The function is similar to the one above except that eval() evaluates what the user typed in eg. "cats" and determines that there is a variable of the same name in the document. Thus the variable the_word becomes equal to the variable cats instead of the text string the user enetered. That variable then updates the same field with it's content, ie. a string containing a list of cats. Again, the example "Entering a variable name WITHOUT eval()", is exactly the same function, but without sending the field entry to eval(), and this simply re-updates the field with the same string, so nothing appears to happen.
Anyway, that's the tutorial over for now. I hope to have a more advanced tutorial up soon, that's not to say we haven't covered some quite advanced topics here, but it would be nice to delve deeper into some of these topics and explore new ones. I don't know when it will be up, but no doubt if you email me and say you want it, it will encourage me to do it sooner rather than later! OK, thanks for reading this far...see you soon!!!